Equipment
Equipment needed for Mead and Wine brewing
This list is not complete but will allow you to see what you will need. I say this because I would love to have a filter or a 3 bottle bottle filler but I don't really need them.
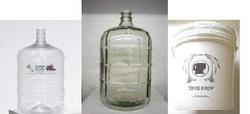
Carboys and Fermenters
Bottling
After the aging and multiple racking our mead or wine has finished dermentation. It is now time to bottle our crystal clear elixers. With the right tools this can be an easy task or it can be a major issue.
First I will advise to buy a corker. Not a cheap hand style but a floor corker. If you have a few gallons it will save you time and lots of effort and spilled product. If you think they are a bit expensive, just put $5.00 a week back until your wine is ready to be bottled. My corker was $67.00 and is a Portuguese floor corker. It is a breeze and takes no effort and about 3 seconds. It can use any style corks or bottles.
Bottles are not cheap! There are many styles and colors available so shop around. Check with your local Homebrew shop and see if they have used bottles. I can get the used for $6.50 a case compaired to $25.00 a case. They will all need sanitized and I just soak them a few hours in a bleach, soap and baking soda bath a old labels come right off. Finish by rinising well with super hot water. I turn up the water heater to high a couple hours ahead of time and use gloves to handle. The key is to always use dark colored bottles with dark wines or meads. Sunlight is not good on the darker colors and can actually bleach out the color. Whites can use clear bottles with no issues.
When filling bottles I would suggest using a bottle filling wand. It is a piece of clear hard tubing with a pressure valve on the end. When you apply pressure to the value it allows the liquid to run through without splashing. When the bottle is full just pull out the wand and the bottle is filled to the correct level for the cork.
Time is a key factor here. Fill the bottles and get the corks on as quickly as possible. The less air the liquid is exposed to the better.

Racking
Racking is the term used to siphon from one container to another. The key to racking is to leave the lees (sediment) behind and get as much of the must(fermenting wine or mead) as possible, without splashing or getting very much air contact. There is a bit of debate on the amount of time between rackings. I personally rack every 30 days or as close to that as I can get. The lees are any sediment including dead yeast cells that have fallen to the bottom. Many yeasts will impart off flavors if left on the lees for very long. There are some lees however that will develop spicy or citrus aromas and flavors if they do stay on the lees. Knowing the yeast is an important part of brewing and something that you develop know of over time.
You will need tubing a racking cane and a bottle filler. When you buy your racking cane just ask them for tubing to fit it but if you are ordering, most use 3/8" tube. I would suggest 6' of tube as you will most likely have the clean carboy on the floor and the other on the counter. The last item on the left is a bottle filler. It has a spring loaded tip and makes life so much easier by allow you to start the flow into the bottle by applying pressure to the tip.
Another item here I am not listing but many are fond of is an autoshipon. With just a press of the pump the must will flow through the tubing. A great extra

Corks
There are 3 types of corks available for use. Regular cork, Altec and Nomacorc. Never use any cork under a first quality grade. No need to go over anything with a regular cork, except to say they are shorter lived. Many of us bottle age our wines and mead. The cork has the ability to let the aging process develop without risk of oxyidation for several months. They are best used for younger maturing wines that will be consumed in less than a year.
Altec corks takes the purest part of the cork and mixes it with a polymer to give it better elasticity and sealing abilities. Great for 12-18 month use. Bench or floor corkers are reccomended but if you want a nice work out, a sturdy hard corker will do.
Nomacorc corks are created by an extrusion process and heat adhesion. This makes them very uniform and very dense celled. These are a bit more expensive but have the best barrier properties for long term storage.
Other corks are available but are not intended to be used for wine storage. Tapered corks are great to stopper a bottle, after it has been opened, for a few days only. Other bottles are available for the screw top lids. I do not use these and it may be my view of making it look cheap but that is how I see a bottle with a screw on top. First impressions are very important!

Fermenting
Fermenting is divided into 2 steps. The first being a primary fermentation and the second is a secondary fermentation.
Primary fermentation is the initial fermentation where sugars are converted to alcohol but oxygen is needed to help the yeast to replicate and grow strong. The sugars (glucose and fructose) are changed to ethanol and carbon dioxide.
As with all equipment, sterilization is very important and any bugs in the must can cause a batch of wine to be a batch of vinegar. So to let the must breath in primary fermentation and keep anything else out just cover the fermenter with a cloth or towel. For the large bucket fermenters a small towel with a large rubberband to secure it will do fine. For a carboy I use a small hand towel and tie it over the top with a shoestring.
Once the yeast is pitched (added to the must) you should see activity within 24 to 48 hours.There are a lot of factors on the speed of the start like, yeast type, yeast hydration, temperature, sugar content and nutrients. Wites or light wines like a cooler temp and reds or dark wines like a bit warmer. Check the yeast for the optimum ranges.
Secondary Fermentation begins when the must is racked (siphoned) into another carboy and is robbed of oxygen. We do this by attaching an Airlock. Sugar conversion continues but in a different way. The anaerobic fermenting is much slower but allows flavor to develop much better.
Malolactic fermentation is where the malic acid, present in all wines, is changed by natural means into lactic acid. This reduces acidity thus reducing some unwanted flavors. Some yeast however are not compatible with concurrent malolactic fermentation. Once again check your yeast strain.
Below you see two styles of airlocks, the first a 3 piece and the second a S-shaped. These are by choice but I use the 3 piece. The thirds item is carboy cap and last is drilled stopper. The airlock is inserted into the tops of these and filled to the line with water or other liquid. I prefer Vodka as nothing lives in vodka, no mold or bacteria. If it would happen to suck back through the airlock the vodka would not hurt your must.

Labels
Labels are an important part of not only the first impression but for storing, aging and knowing what you are drinking. There are some elements I would suggest to always have on the label; Type of wine or mead, Year, sweetness, and ABV %.
The type of wine is very important along with other additions which will effect taste. I made 2 apple wines this year so far. The first was a sweet apple wine, no additional ingredients just apples and juice. The second was the same receipe but with the addition of cinnamon sticks during fermentation. The second label shows Cinnamon Apple Wine. When makeing mead I may also have 2 traditional receipes or just use the same receipe with different yeast but different levels of sweetness. Make sure the label reflects the changes.
The year is very important to know. Not only does it let the age of the bottle be known the will help if the next years batch comes out a bit different. I say this because all fruit and even honey can have variations based on yearly temperature, humidity and rain fall. Keep in mind you are using the date it was started not the date it was bottled. Bulk and bottle aging for a few months or even a year makes a big difference.
Listing the sweetness level will help you and others determine food matching or even if they want to try the bottle. I do not prefer a very dry wine for drinking, but I do love to cook with them. Use Dry, Semi-Dry, Semi-Sweet, Sweet and Dessert.
The ABV % should be listed as close as possible to the actual level. Don't round up or down. If it is 14.5% then be precise.
Other things can include what you want or even might want the drinker to know. I have a good memory for what I made but you never know where one of your bottles may end up. I gave a few bottles to a friend and they gave one as a gift and it went half way across the US. They do an internet search and know it came from Missouri.
Be creative and ask for help. Several programs are great like Paint Shop Pro, Word, PhotoShop and others. I personally use Publisher as I know the program well and it turns out a great size difference with almost all label manufactures.